Setup guide
Set up Sellora, step by step
From the download to your first eBay listing in about 10 minutes. Every click is written down, so you don't need any tech skills.

Setup video coming soon
Until it's here, the six steps below show every click.
What you need
- Google Chrome on a Windows or Mac computer. Sellora doesn't run on phones or tablets.
- Your eBay seller account and your Amazon account.
- An email address you can open, for your Sellora account.
- A card to pay for your plan. Stripe handles the payment.
-
Step 1: Download Sellora and unzip it
About 2 minutes
- Download Sellora. The file lands in your Downloads folder. Download Sellora
- Download the Sellora file (its name ends in
.zip). The download link is in the #📢-announcements channel of our Discord. - Download the Sellora file (its name ends in
.zip). No link yet? Email [email protected] and we'll send it. - Open your Downloads folder: click the yellow folder icon on the taskbar (File Explorer), then click Downloads on the left.
- Right-click the Sellora file and choose Extract All…
- Click Browse… and click Documents on the left. Click New folder, type
Selloraand press Enter. - Double-click the new Sellora folder, then click Select Folder, then Extract.
- Leave the folder where it is. Chrome runs Sellora from it, so don't move or delete it later.
On a Mac: double-click the
.zipin Downloads, then drag the folder it makes into Documents. -
Step 2: Add Sellora to Chrome
About 2 minutes
- Open Google Chrome.
- Click the address bar at the very top, type
chrome://extensionsand press Enter. - Turn on Developer mode with the switch at the top right of the page.
- Click Load unpacked. It appears at the top left once Developer mode is on.
- In the window that opens, click Documents, then double-click Sellora. If you see a folder called assets, you're in the right place. If you see one other folder instead (its name starts with Sellora), double-click that one first.
- Click Select Folder (on a Mac, Select). A Sellora card appears on the page, with its switch turned on.
Chrome says “Manifest file is missing or unreadable”? You picked a folder one level too high. Click Load unpacked again and open one more folder before you click Select Folder.
-
Step 3: Pin Sellora to your toolbar
About 30 seconds
- Click the puzzle-piece icon (Extensions) at the top right of Chrome, next to the address bar.
- Find Sellora in the list and click the pin icon next to it.
- Sellora's logo now sits beside the address bar. Click it whenever you want to open Sellora.
-
Step 4: Create your account
About 3 minutes
- Click Sellora's logo in your toolbar. A small window opens that says Log in to Sellora. If a yellow note says “New install with no data yet” and you're new to Sellora, you can ignore it.
- Click Create an account, under the Log in button. Sellora's Account page opens in a new tab.
- Type your email, then a password with 8 or more characters, then the same password again. Click Create my account.
- Open your email, find the message asking you to confirm your email address, and click the link in it. Nothing after a few minutes? Check your Spam folder, or click Send the email again on the Sellora page.
- Close the page the link opened and go back to the Sellora tab. Click Go to log in, type your email and password, and click Log in.
Already have an account? Click Sellora's logo, type your email and password, and click Log in. Forgot your password? Click Forgot password? and Sellora emails you a 6-digit code to set a new one.
-
Step 5: Choose your plan
About 2 minutes
New accounts start with a free trial of 7 days and 50 listing credits, so you can skip this step until your trial ends.
- After you log in, your Account page shows your plan and credits, with every plan below. Scroll down to Monthly plans. To come back here later, click Sellora's logo, then Account & plans at the bottom left.
- Click Choose on the plan you want, for example Choose Pro. To pay once instead, click Buy Lifetime under Pay once. Not sure which? Compare the plans.
- Stripe's secure checkout opens in a new tab. New to Sellora and picked Pro? Its first-month price is already applied there, so there's no code to type. Type your card details and click the pay button: Subscribe for a monthly plan, Pay for Lifetime.
- When Stripe says “Thank you! Your payment went through”, close that tab and go back to your Sellora Account page.
- Click I just paid — refresh. Your plan and listing credits appear at the top. 1 credit = 1 listing.
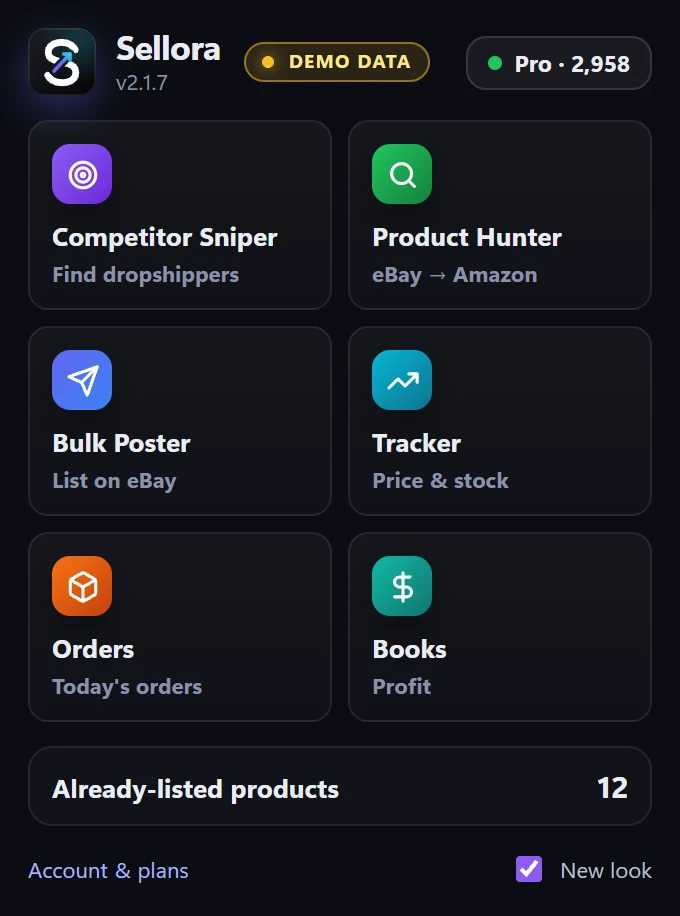
Click Sellora's logo any time: your plan and credits show at the top right, with the six tools below.
-
Step 6: Post your first listing
About 3 minutes
- In the same Chrome, go to ebay.com and log in with your eBay seller account. Sellora fills in eBay's listing form in this Chrome, so you need to be logged in.
- On amazon.com, open a product you'd like to sell. For your first one, pick a product whose page says it ships from Amazon.
- Click the address bar and press Ctrl + C to copy the product's link (⌘ + C on a Mac).
- Click Sellora's logo, then Bulk Poster.
- Click inside the 1. Amazon links box, press Ctrl + V to paste the link, and click Add to queue.
- Under 2. Pricing, check your Markup % and Price ending (like .99). Your eBay price is the Amazon price × (1 + your markup), rounded up to that ending. For example, 105% on a $22.97 item gives $47.99.
- For your first listing, untick Auto submit under 3. Run settings. Sellora then fills in eBay's form and waits for you, instead of listing it straight away.
- Click Start listing. Sellora opens eBay's listing form in a new tab and fills in the title, photos, price, item specifics and description. This uses 1 listing credit. If the listing fails, you get the credit back.
- When the product's row in the Bulk Poster says Review, go to the eBay tab, check everything, and click eBay's List it button. Back in the Bulk Poster, the row turns Listed, and the Tracker starts keeping its price and stock in line with Amazon. If the row doesn't change, click It's live — mark listed on it.
- Happy with it? Tick Auto submit again, and next time Sellora lists straight away.
The row says Skipped? It says why. Usually the product isn't shipped by Amazon (FBA only is ticked), its brand is on eBay's VeRO list, it's out of stock, or its price is outside your Min and Max Amazon price. Paste another product and click Add to queue again.
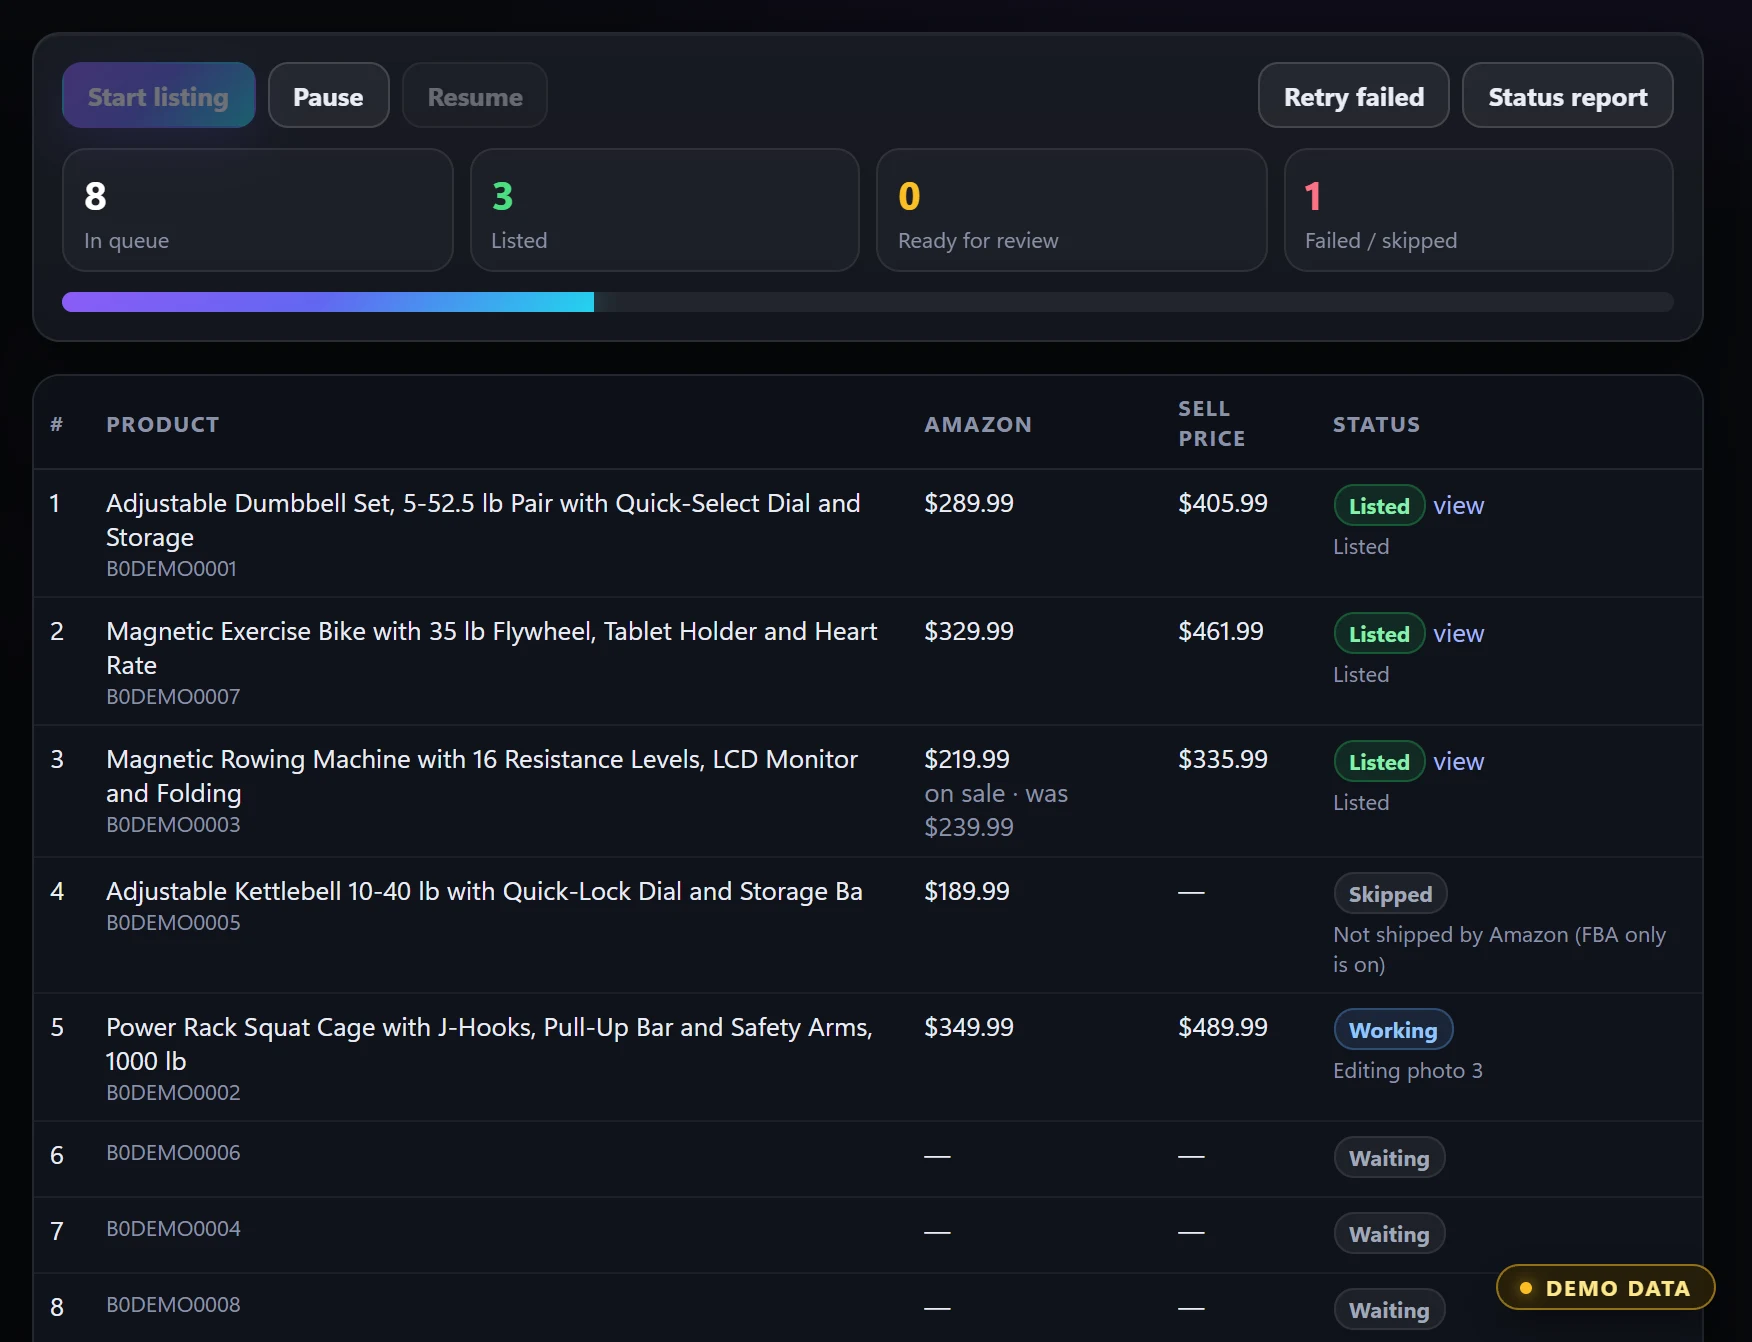
The Bulk Poster during a run. Each product shows Waiting, Working, Listed, Review or Skipped.
What's next
- Find products to list. Competitor Sniper finds eBay sellers who already sell well, Product Hunter matches their items on Amazon, and one click sends them to the Bulk Poster. See how it works.
- Orders. The Orders tab needs the PasteMe by Trackerbot extension turned on. Its badge in the Orders tab turns green when it's ready.
- Learn every tool. The #📖-how-to-use channel in our Discord walks through each one with pictures.
Keep your Sellora data safe
- Leave the Sellora folder where it is. Your listings, Books and settings are tied to the folder Chrome loaded Sellora from.
- Never click Remove on Sellora's card at
chrome://extensions. It deletes your Sellora data from Chrome. - Updating? Copy the new version's files into the same folder, then click ↻ on Sellora's card. The full steps are in our Discord's #🚀-getting-started channel.
- Backups happen on their own. Sellora saves a copy of your data to your Downloads folder every week. You can change that on the Books page.
Stuck on a step?
Tell us which step you're on, what you clicked and what you see. A screenshot helps. Never send us your password.
Haven't picked a plan yet? See plans and prices.